
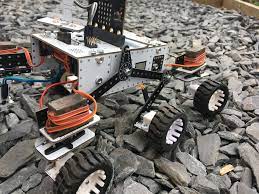
The 4tronix M.A.R.S. Rover is an autonomous vehicle meant to navigate rugged terrain on Earth rather than on Mars. M.A.R.S. does not relate to the planet in this instance; instead, it is an acronym for Mobile Autonomous Robotic Systems. Let us investigate.
What Exactly is the M.A.R.S. Rover Kit?
The M.A.R.S. rover is available as a kit with no soldering required. The kit comes with everything you need, including tools, but it is preferable to use screwdrivers since they fit better. The kit includes two types: Raspberry Pi Zero and BBC micro: bit. You can put the Raspberry Pi version to the test. The Raspberry Pi Zero or BBC micro: bit and the four AA cells are not included. A microSD card is also required for the Raspberry Pi.
The 4tronix website offers an extra keypad. With the Raspberry Pi version of the rover, placing a camera on the ultrasonic transducer pole is optional.
The kit’s package is small (18 cm x 16 cm x 8 cm), yet it’s rather hefty (600 g) and stuffed with plastic bags carrying components. There is no manual supplied. The 4tronix blog has complete assembly and program guidelines, so you’ll need a stable internet connection to put the rover together.
Some Assembly Pointers
Here are some pointers to assembling the rover:
- Get yourself some proper screwdrivers.
- Three 18 mm long screws pass through the circuit boards. Ensure they’re snug before using a locknut to secure the component on the other side since it may go loose if you tweak the nut to make the linked pieces spin smoothly.
- The servo connections are all oriented in the same direction. The servo cables are colour-coded and neatly identified. GND is brown, while SIG is yellow (signal). In running the services program, it’s helpful to write down the number of each servo.
- If the servo lines aren’t folded down far enough, the ultrasonic transducer mast might run into them.
- After connecting the servos, you may clean things up by wrapping their lines around the servo bodies. Leave the wheel motor wires free, on the other hand, to prevent the rocker arms from moving.
- Cutting off the protruding ends of the servo arms is optional since it simply helps the rover seem neater.
Intelligence And Strength
After the rover has been assembled, put a Raspberry Pi Zero 2 W on its top. The Raspberry Pi Buster OS was loaded on a microSD card. If this had already been used in another project, the Raspberry Pi could connect to Wi-Fi networks and also have SSH access. Use a USB power to download and install the software needed to make the rover work to conserve cells. Again, the directions are clear and extensive but only available online.
Also, instead of a Zero 2 W, try a Raspberry Pi Zero; it will work similarly. The benefit of using a Zero 2 W is that it boots up much quicker.
The Raspberry Pi does not provide power to the rest of the rover; therefore, batteries are required. If you get an error message concerning the I2C bus when attempting the examples, and you’re sure that you enabled it on the Raspberry Pi, check the On/Off switch and the batteries. A blue LED indicates the rover’s status.
The Rover’s Programming
To conserve cells, do everything possible with the Raspberry Pi-powered through USB while building your programs for the rover, and turn the rover on when testing things out.
You may test all of the examples offered by 4tronix. You didn’t have to program anything yourself. Because accessing the rover’s RGB LEDs needs administrator rights for some reason, any script that uses them must be executed with sudo.
It’s incredibly remarkable to drive the rover over obstacles. Although it cannot move quickly, the robot’s rocker arms enable it to climb over barriers as if they were not there.
An Excellent Rover
The 4tronix M.A.R.S. Rover kit is a high-quality kit with ornamental print and PCB components that make it appear excellent once constructed. It’s a little larger than the box it came in, measuring 20 cm x 18 cm x 16 cm. The robot is simple to put together since everything fits together precisely (which is unusual), and the directions are clear and thorough. It’s also simple, and the examples and test programs are installed and executed without issue. The rover is ready to drive about after the software is deployed, and it becomes almost unstoppable.
Adding To The Kit
Four additional mounting holes on the main PCB may be used to connect extensions, and there are plenty of connections available for adding more servos. (Another servo was included in my kit’s spare parts bag.) There are also two I2C extension connections available, which can be used to attach sensors.
The 4tronix rover is simple, although there are a few tricky parts, such as putting on the motor mounting brackets without the nuts coming out, fastening the locknuts, and connecting the motors. Pay great attention to the orientation and arrangement of essential pieces, such as the bogeys and servos, since it’s simple to make a mistake and have to start again.


Comments